Deviation Actions
Literature Text

Aim
The goal of this tutorial is to help you to get a better understanding about exposure and teach you how to evenly expose your photos. This is a follow-up of my last tutorial: The Exposure Triangle.Introduction
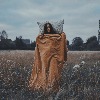
When I first started out with photography, I only shot in auto mode. I was experimenting away and manual mode seemed too complicated and time-consuming for me at the beginning. I managed to take a few lovely shots, but many came out completely different from what I initially saw through my viewfinder.Here's a photo I took in 2008:

Absolutely beautiful scenery, but far too dark in the foreground. This was not what I was going for at all at the time and it was utterly frustrating seeing the perfect lighting through my viewfinder and then having something completely different on my screen.
What was the problem? I was shooting in auto-mode. What happened was that the light meter of my camera picked up that there was a lot of bright light from the sky, so it automatically made the rest of the image darker to capture the bright details in the sky. However, the result was an overexposed sky and an underexposed foreground which made me very, very sad.
Later on, I realised that this kept happening to me because I relied on auto-mode and didn't take the time to understand exposure. In my last tutorial, I explained some things about the Exposure Triangle. If you are not aware of what Aperture, Shutter speed and ISO mean, then please have a look at that tutorial, otherwise what I explain here might not make a lot of sense to you.
Exposure
Exposure basically means the amount of light that your camera's sensor is exposed to (or put into contact with) in one shutter cycle (or one click of the shutter release button). Below are three images with three different exposures:


So, class, which one of these is evenly exposed? 
Ding! Ding! Ding! You got it! The middle one. 
There are two things you want to (generally) avoid. They are: overexposure, as seen on the image on the far left and underexposure, as seen on the far right image.
Overexposure
I find that overexposure is a more common problem than underexposure. An overexposed image is far too bright and the brightest tones look white and have lost a substantial amount of detail. Here, have a closer look:

Do you see any detail in the brightest parts of the flower? No, me neither. It's very unfortunate. If your photo looks like this on the display screen, you should reduce the exposure a few stops for your next photo of the scene. (Don't worry, I'll let you know how in a bit.)
Underexposure

Oh boy, that's dreadfully dark. What's in the background? The problem with underexposed images is that the darkest tones lose detail. If you shoot in raw, you just might be able to salvage some of it, but the quality may still not be up to your expectations.
Even exposure

Goldilocks would sure love this photo, cause it's just right!
So, how do you get an evenly exposed image? Start shooting in manual mode and learn about the exposure meter.
The Exposure Meter
This is what the display screen on my camera looks like. Circled in red is the exposure meter. You can also see your exposure meter while looking through the viewfinder. It should be right at the bottom.

For most shots, you will want the pointer in the middle to ensure that your photo is evenly exposed. Of course there are scenarios where you may need to use one stop or a few stops higher or lower, for example, you would want to go a few stops lower to capture the detail in a flame, or a few stops higher if you're in a dark environment. For now, just focus on keeping the pointer in the middle.
Oh right! You don't see a pointer yet. The pointer usually shows up once you've focused on your subject.
Here it is:

Now in order for you to keep that pointer in the middle, you will have to adjust your shutter speed, your aperture, your ISO or a combination of the three. That little dial in the front of your DSLR controls this pointer. Here's what the main dial looks like on my camera:

For most cameras, it's pretty much the same. Turning this dial in an anti-clockwise direction moves the pointer on the meter to the right and increases the overall exposure, meaning the image will appear brighter. Turning this dial in a clockwise direction will move the pointer to the left and decrease the exposure, meaning the image will be darker.
Shutter Speed
Aperture
As I also mentioned in my previous tutorial, if the shutter speed is very slow, your image will be blurry. If you want your image to be brighter, but you don't want it to be blurry, you will have to compensate by adjusting the aperture size. Increasing the aperture size will let more light in. (Remember, though, that a smaller f number means a larger aperture.) To adjust the aperture, you will need to hold down the Aperture/Exposure compensation button while turning the main dial. This is what the button looks like on my T3i:

Similarly, if you want to decrease the brightness of your image, then you'll need to use a higher shutter speed or smaller aperture.
ISO
Lastly, if you are in a low-light scenario and it's impossible to open up your aperture any more and decreasing the shutter speed any further will cause unwanted blur, adjusting your ISO settings can help. Increasing your ISO speed to, say, 1600 will make your image grainier, but it will allow you to shoot brighter images in low light.


It all sounds like a lot to take in, but once you start experimenting with these three you'll see how much of a difference it can make! Once you've done it a few times, it's a piece of cake. Practice makes perfect!
To recap:
 This setting would generally cause an overexposed image:

This setting would generally cause an underexposed image:

This is where you generally want to keep that pointer. Right in the middle.

To adjust your exposure meter, you need to adjust your shutter speed, aperture or ISO settings.
Go out and try out your camera's manual mode! I dare you!
Conclusion
There you have it: my exposure meter tutorial. I hope this was helpful and not too complicated to understand!
Did you enjoy this tutorial? Was it helpful? Your feedback would be much appreciated as I intend to write more of these. Thank you

References/Further Reading
Wiki for exposure: en.wikipedia.org/wiki/Exposure…
My previous tutorial: silber-englein.deviantart.com/…
And of course stuff from my own experience as an amateur photographer
My Other Tutorials
The Exposure Triangle Tutorial
Why I Now Always Shoot in Raw


